MySQL Notes

MySQL Command Line and Configuration Notes

Drop tables with wildcard:

There are multiple ways to specify MySQL credentials, this is not the best, but simply an example of how to drop tables using a wildcard pattern. In this case, command line history such as .bash_history will store your MySQL username and password plaintext, and an extended process listing will also reveal both username and password. When run from the command line like this, the SQL commands and the credentials are not stored in the MySQL history file (.mysql_history).  On closed (private) systems, the risk is low, especially if you clean up after these maintenance activities by purging the command histories.

mysql -u user -p password database -e "show tables" | grep "table_pattern_to_drop_" | awk '{print "drop table " $1 ";"}' | mysql -u user -p password database

Update WordPress home URL

There are times when moving or copying WordPress blogs from one server to another, the owner may want to update the URL associated with the specific site.

A simple MySQL update can match the WordPress blog to a new site URL:

mysql> select option_value from wp_options where option_name = 'siteurl';

+--------------------------------+
| option_value                   |
+--------------------------------+
| http://www.example.com |
+--------------------------------+
1 row in set (0.00 sec)

mysql> select option_value from wp_options where option_name = 'home';

+--------------------------------+
| option_value                   |
+--------------------------------+
| http://www.example.com |
+--------------------------------+
1 row in set (0.00 sec)

mysql> update wp_options set option_value='http://server.newsite.com' where option_name='siteurl';

Query OK, 1 row affected (0.00 sec)
Rows matched: 1  Changed: 1  Warnings: 0

mysql> update wp_options set option_value='http://server.newsite.com' where option_name='home';

Query OK, 1 row affected (0.00 sec)
Rows matched: 1  Changed: 1  Warnings: 0
 

w3af web security assessment tool gets support from Rapid7

Rapid7, which purchased the Metasploit attack framework last year, has agreed to sponsor the open source w3af web assessment and exploit project. This is fantastic news for web application development teams, since it shows the open source (and hence more affordable) tools they can use to improve the security of their applications are maturing.

Websites like sectools.org maintain lists of various security tools and point to numerous open source web application fuzzing and testing tools, including BurpSuite, Nikto, WebScarab, Whisker and Wikto. Although each of the open source tools I use have various strengths, w3af is IMHO the first reasonable challenger to commercial web application testing tools like IBM’s AppScan.

Can we please get rid of bad input validation errors now??

For a commercial IT security professional that wants to help an internal web application development team improve the security of their applications, tools like IBM’s AppScan and Acunetix WVS can save valuable time by generating reports that include not only the vulnerable URI but also include vulnerability background information (CVSS, OWASP, WASC), the specific HTTP request/response strings and suggested code fixes. This is particularly valuable to a security architect or operations role that is pressed for time (an army of one anyone?).

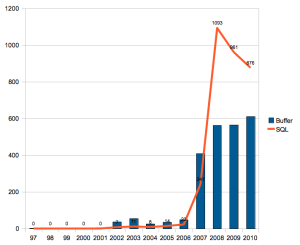
The w3af support from Rapid7 will enable this excellent tool to mature more quickly and improves the capability for any web development team, regardless of funding, to improve their security. Can we please get rid of bad input validation errors now?? My recent thesis illustrated the downright depressing numbers of SQL injection flaws that continue to exist. With tools like w3af, there is no excuse left for web developers to press applications into production with these injection flaws that are trivial to avoid. At the very least a survey of the NIST National Vulnerability Database does show the number of SQL injection flaws starting to drop. Unfortunately they still substantially outnumber traditional memory corruption flaws such as buffer overflows.

Explosion of SQL buffer errors

Explosion of SQL buffer errors

As you can see, the story up to 2008 was pretty grim for web applications – SQL injection flaws increased by over 1,500% in the same time buffer overflow errors increased by just over 500%.

Although it looks like there has been a reversal of the shocking explosion of SQL injection flaws, the sheer volume of these web application flaws is astonishing .. especially since injection flaws have been around for about 10 years. Not exactly a problem that has recently snuck up on us.

Web developers that still turn out applications that contain SQL or command injection errors and most cross site request forgery errors are simply guilty of gross negligence.

Despite the web development industry knowing these errors exist and good developers designing and coding to avoid these issues, there is still a need to build sufficient forensics around externally facing (publicly accessible) applications to enable reconstruction of attacks. In my next post, I outline a summary of my thesis “Effective SQL injection attack reconstruction using network recording”.

Resetting WordPress user passwords

Resetting WordPress 3.0 user passwords can be done directly within MySQL through the following procedure.  This assumes your installation of WordPress stores user passwords in the wp_users table as MD5 hashes and the unique site prefix for all WordPress tables in MySQL is _x.

Connect to the database via your favorite GUI (phpMyAdmin, Navicat) or command line with either the WordPress role account or any other MySQL user account with select and update privileges on the WordPress database:

update wp_x_users set user_pass = MD5('123abc890') where user_login = 'administrator';

This will update the password for user ‘administrator’ to ‘123abc890’.  Once this has completed, either flush the wp_x_users table or exit the tool used to access the database to cause the updates to be committed.  Sign into WordPress with the new password and optionally change the password via the user interface.

IMAP mailstore migration .. again

So last weekend, I discovered that Spamhaus decided it would be a good idea to place all of the public IP addresses for Slicehost (my Linux VPS hoster) into their Spamhaus block list (SBL). This covered both my slice in Dallas and the one in St. Louis – meaning an impressive chunk of inbound mail to my domains was being trashed by the sending MTA and an even bigger chunk of my outbound mail was being outright rejected since the sending IP’s were on the SBL.  Slicehost worked hard to convince Spamhaus to recind the blocklist, so the Slicehost IP’s got moved over to the less-nasty-but-you’re-still-probably-a-spamming-dirtbag Policy Block list (PBL) assuming affected IP owners would request to be removed from that list.

Sample query to see if you’re on any Spamhaus block list:  http://www.spamhaus.org/query/bl?ip=10.11.12.13

It seems it’s time to relinquish the care and feeding of my own Postfix mail system and turn to a hosted solution.  This means I need to migrate about 5GB of IMAP store to another site (again).  Last time I did a wholesale migration, I used imapsync to make the transition painless. In the code example below, an SSL connection to the IMAPS server at imap-server.sourcedomain.com is made with username@sourcedomain.com and the password stored in the plaintext file secret1. An SSL connection is made to the target system (which happens to be the server on which the imapsync tool is running, but could just as easily be another IMAPS server somewhere on a network accessible to the host where imapsync is running). The –delete and –expunge1 arguments will clean the successfully moved messages from IMAP store #1 .. so be sure you have your messages on the target successfully! Imapsync can be run iteratively to ensure you have got all the messages from your source.


/usr/bin/imapsync \
--host1 imap-server.sourcedomain.com \
--ssl1 \
--authmech1 LOGIN \
--user1 username@sourcedomain.com --passfile1 secret1 \
--host2 127.0.0.1 --user2 username@targetdomain.com --passfile2 secret2 \
--ssl2 \
--delete --expunge1 \
--buffersize=128

And one can use the

--dry

option to just test the process but not actually move any of the messages.

So that’s it – I’m about half way though migrating my current IMAP stores over to a hosted mail solution, so that I don’t need to keep up with the increasing level of care and feeding that running your own mail service requires.  Before I get too many darts about that .. I first started running my own personal MTA in 1995, adding spam and av filtering over time, and adding substantial redundancy (servers, sites, storage) so I could rely on it and fix things that broke as I had time rather than right when they broke (which was always at a bad time).  My new hosted solution takes over from two VPS servers running Postfix, Spamassassin, ClamAV, Greylisting with the IMAP store replicated across data centers in different states (15 minute rsyncs).  So soon, the (hopefully) last Allen Pomeroy owned and operated MTA can be turned off, while I get to work on fun stuff, rather than figuring out why my email is bouncing.  🙂

Update 2012/12/17:

Sometimes manual manipulation of your mailstore via IMAP is needed, so here’s how I deleted a large number of folders I had trashed and were being synced to my new system from the old.  Kinda clunky, since I didn’t get the scripted version to work (just used a copy/paste in an interactive bash session), but got the job done for now.

Connect to the IMAP server using SSL:
openssl s_client -crlf -connect imap.emailsrvr.com:993

* OK [CAPABILITY IMAP4rev1 LITERAL+ SASL-IR LOGIN-REFERRALS ID ENABLE IDLE AUTH=PLAIN] Server ready director6.mail.ord1a.rsapps.net

Log in with your email credentials:
0 login user@domain.com Password

0 OK [CAPABILITY IMAP4rev1 LITERAL+ SASL-IR LOGIN-REFERRALS ID ENABLE IDLE SORT SORT=DISPLAY THREAD=REFERENCES THREAD=REFS MULTIAPPEND UNSELECT CHILDREN NAMESPACE UIDPLUS LIST-EXTENDED I18NLEVEL=1 CONDSTORE QRESYNC ESEARCH ESORT SEARCHRES WITHIN CONTEXT=SEARCH LIST-STATUS QUOTA] Logged in

List the folders you want to remove:
0 list "" "Trash.*"

That didn’t return the list I was expecting, so I listed all folders
0 list "" "*"

… and realized the source mail system adds “INBOX” on the front of the folder names, so then this command worked to list the folders to be deleted:
0 list "" "INBOX.Trash.*"

I copied the output and edited it to insert the folder name into a delete command:
0 delete "INBOX.Trash.Folder1"
0 delete "INBOX.Trash.Folder2"
0 delete "INBOX.Trash.Folder3"

0 OK Delete completed.

Finish off the session by logging out:
0 logout

* BYE Logging out
0 OK Logout completed.
closed

Building a web security lab (with VMware Fusion)

Problem: VMware machines load boot loader immediately, no BIOS banner, so can’t get into BIOS to alter boot settings.
Solution: Edit the vm’s .vmx file and add the line:

bios.bootDelay = "5000"

which adds a 5000 millisecond (5 second) delay to the boot, or add:

bios.forceSetupOnce = "TRUE"

to make the VM enter the BIOS setup at the next boot.

Problem: VMware Fusion 3.0 doesn’t give a way to edit the virtual network settings via the GUI.
Solution: To change the subnet used by the NAT or HostOnly networks, go root in Mac OS X and edit

/Library/Application Support/VMware Fusion/networking

and set the following lines to the subnets desired:

answer VNET_1_HOSTONLY_SUBNET 192.168.35.0
answer VNET_8_HOSTONLY_SUBNET 10.10.1.0

To add additional custom isolated host only VLANs, also edit the networking file and add additional VNET definitions. There can apparently only be 8 VLANs with VLAN 1 and 8 already pre-defined.

answer VNET_2_DHCP no
answer VNET_2_HOSTONLY_NETMASK 255.255.255.0
answer VNET_2_HOSTONLY_SUBNET 10.10.21.0
answer VNET_2_VIRTUAL_ADAPTER yes
answer VNET_3_DHCP no
answer VNET_3_HOSTONLY_NETMASK 255.255.255.0
answer VNET_3_HOSTONLY_SUBNET 10.10.22.0
answer VNET_3_VIRTUAL_ADAPTER yes
answer VNET_4_DHCP no
answer VNET_4_HOSTONLY_NETMASK 255.255.255.0
answer VNET_4_HOSTONLY_SUBNET 10.10.23.0
answer VNET_4_VIRTUAL_ADAPTER yes

Now create your vm with as many network interfaces as you have separate VLANs (vnet) then edit the node.vmx vm configuration file and change the interfacename.connectionType to custom, and define the VLAN (vnet) that interface will attach to:

#ethernet0.connectionType = "nat"
ethernet0.connectionType = "custom"
ethernet0.vnet = "vmnet3"

Also realize that VMware will take the .1 host address on each vmnet – so you cannot assign .1 to any of your VMs.

Problem: Ubuntu 9.10 persistent network configuration (stores the MAC address of network adapters), so if you copy a machine, by default Ubuntu will setup a new logical adapter (eth1) since the MAC address has changed (when you answer I Copied It in VMware).
Solution: Tell VMware you copied the machine, so it will chose a unique MAC address. Boot Ubuntu into single user mode (another article on that to follow) then edit the MAC address associated with eth0.

sudo vi /etc/udev/rules.d/70-persistent-net.rules

find the stanza of the network interface in question (NAME=”eth0″) and set the following ATTR tag to the new MAC address:

ATTR{address}=="new-mac-address-here"

Linux RAID, LVM and crypto Filesystem Notes

LVM Notes

I wanted to upgrade the disks in my Linux PVR to a 1TB pair and thus had to migrate from one existing disk (/dev/sda) to the new (/dev/sdb):

1. Add new physical disk to system

2. Partition disk to have a linux LVM partition – use flag 0x8e

# fdisk /dev/sdb

3. Add to LVM

# pvcreate /dev/sdb2

4. Add physical LVM volume to a LVM volume group (VolGroup00)

# vgextend /dev/VolGroup00 /dev/sdb2

2. Move all lvm volumes off old lvm disk

# vgdisplay -v (look for old physical volume name)

# pvmove /dev/olddisk      # will move all physical extents from olddisk to any available pv in the vg

3. Remove old disk from vg

# vgreduce /dev/olddisk

4. Remove old disk from LVM

# pvremove /dev/olddisk

RAID Notes
Debian RAID setup on my PVR:
/dev/md0  /boot
/dev/hda1
/dev/hdb1
/dev/md1  /
/dev/hda2
/dev/hdb2
/dev/md2  swap
/dev/hda3
/dev/hdb3
/dev/md3  /data
/dev/hda4
/dev/hdb4

Show detail of RAID set:
# mdadm –detail /dev/md0

Detach mirror member:
– first mark member as bad (unless is really is bad, in which case it’ll already be marked faulty):
# mdadm –set-faulty /dev/md0 /dev/hdb1
– now remove it from the RAID1 set
# mdadm –remove  /dev/md0 /dev/hdb1

To reattach member (after partitioning, or if it’s the same disk):
# mdadm   /dev/md0  –add  /dev/hdb1
– to watch the progress on the resync, look at /proc/mdstat
# cat /proc/mdstat

I think now (2010/01/24) the faulty syntax is:

mdadm /dev/md0 –fail /dev/sdb1

then

mdadm /dev/md0 –remove /dev/sdb1

Crypto Filesystem Notes

Linux (2.6) crypto filesystems are supported via a loopback device. Various ciphers can be specified.  This example, default AES cipher is used and the disk partition is /dev/sdb1 – which is just setup as a normal Linux (0x83) partition.

1. Load the crypto filesystem module

modprobe cryptoloop

2. Start the crypto device (I’ll insert initialization instructions here later)

Note – you don’t need losetup, if the parameters are specified in fstab and mount does the startup. When losetup runs, it will prompt for the passphrase used to encrypt the partition. Once the crypto driver has the correct key to allow on the fly encryption/decryption, then processes that use the partition see cleartext (such as mount).

losetup -e aes /dev/loop0 /dev/sdb1 || exit 1
mount /bu